Wednesday 26 December 2012

Low fat simple gajar ka halwa


Celebration of the winter chill is incomplete without Gajar ka halwa. In anticipation of sudden disappearance of red carrots from Bangalore vegetable markets, I made this pudding almost a fortnight ago, however as luck would have it ,I found time now only to post it.

Its a very simple recipe with emphasis on low fat and sugar,unlike the conventional method which requires loads of ghee, sugar, milk and hours of slaving on the stove. The final outcome is yummy and can be had without guilt any time:)

Ingredients

Carrots( peeled, washed and grated)- 1kg
Ghee- 3 tsp
Sugar-1/2 cup
Milk powder-1/2 cup
cardamom green crushed-3
Nuts of your choice chopped-1/3 cup

In a heavy bottom skillet, melt ghee.
Add grated carrot, mix, cover and let it cook in its own juices for ten minutes.
Remove lid, add sugar, milk powder and cardamom. Combine nicely and cover.
Stir once more after five minutes and cook let it cook for another five minutes.
Garnish with chopped nuts and serve warm.

Mum's recipe-dahi bhalla


This summer, when I went home to my parents' place, I fell in love with my Mum's dahi badas allover again. I was having it after a long long time and could not have enough of it. I would have six seven badas in one go and still would not feel satiated. Such light and fluffy vadas with chilled yogurt and tangy tamarind sauce were like a balm for the soul than stomach in the seering Lucknowi heat. I HAD TO learn it from Mum and do a test run in her presence so that I could do it on my own back in Bangalore. Mum painstakingly taught me and Dad like a veteran connoisseur approved my work.
I made dahi bhallas for Xmas today and kept thinking of Mum. I can never match her prowess in the kitchen..never in a thousand years and there is so much to learn from her that a thousand years wouldn't be enough..Here is Mum's no fail dahi badas..spreading love and joy this Xmas..just the way my mum does:)

Ingredients-

Moong dhooli daal-1/2 cup
Urad dhooli daal-1/2 cup
To be soaked overnight
A pinch asoefetida
Oil to fry

Tamarind sauce

Lemon sized ball of tamarind
Oil-1 tsp
Cumin-1 tsp
red chili powder-1/2 tsp
Asoefetida- 1/4 tsp
Black rock salt- to taste
Jaggery or brown sugar-1/2 cup
Water-2 cups
Raisin-1/4 cup
Cashews-Handful roughly chopped

To serve
Plain yogurt
Roasted cumin powder
Chaat Masala
Salt
Optional-juliennes of ginger, chopped green coriander, grated carrot

Mix the daals, wash and soak in two cups of water overnight.
Next morning,add a dash of asoefetida and grind it to a paste.
Now here lies the crucial part-before frying whisk the paste vigorously.
Take a bowl of water, add a drop of this paste.
If the drop sinks,there is more whisking to do and if the drop floats, the paste is ready to be fried into bhallas. This is very crucial for bhallas being light and fluffy. Without passing this test, be prepared for rock hard and heavy dumplings.
Heat Oil and add spoonfuls of batter and fry into dumplings.
Take out the dumplings in a tissue paper lined plate to soak extra oil.
Next heat a vessel full of water with a teaspoon of salt.
Bring the water to boil and switch off the gas.
Dunk the dumplings in boiling water and remove after two minutes.
Drain and squeeze out excess water and store the dumplings for anytime use.
Stored in fridge,dumplings should keep well for a week.


  Tamarind sauce
This is super easy to make and though its a  must for dahi badas it can be used for all kinds of Indian chaats. In fact I personally at times like to peep in the fridge and lick the sauce straight from the jar..stealthily!

Soak the tamarind in a cup of hot water. Extract the pulp and discard the seeds and hard skin.
Keep aside.
Heat one table soon of oil. Add cumin seeds, red chili powder and a pinch of asoefetida.
Add the tamarind pulp and two cups of water and bring it to a boil.
Now combine jaggery or brown sugar and let the sauce simmer.
Add salt,raisins and cashews.
Switch off the gas after five minutes.
Cool the sauce and store it bottled in the fridge.

To serve
Cover the dumplings in whisked smooth yogurt.
Sprinkle salt,chaat masala and roasted cumin powder.
Add a splash of tamarind sauce and garnish further with chopped coriander, grated carrot and juliennes of ginger if you wish.
Serve chilled.


Sunday 9 December 2012

Upside down Almond caramel layered coffee cake


Finally the final verdict in my eighth month-I don't have gestational diabetes and I can eat whatever I like.Yes, whatever my heart and baby fancies inside:) I am sooo delighted!!!
This welcome news arrived after a final cumbersome 100 gm glucose challenge test, yesterday.
My little one inside and me decided to indulge in something sinful but healthy and we go for an upside down almond and caramel layered cake.

This turned out to be a pretty looking cake and very yum too. Plus we were able to make use of all the almonds we received during Diwali:)

Ingredients
 For the caramel layer

Ghee-4tsp
Brown sugar-1/2 cup
Honey-1/4 cup
Almonds slivered-1 cup

For the coffee cake
 AP Flour-1 and 2/3 cup
Baking powder- 1 tsp
Baking soda-1 tsp
Salt-1/2 tsp
Eggs-2
Oil-1 cup
Sugar-1 cup
Instant coffee granules-3 tsp
Boiling water-2 tsp

Melt the ghee and pour it in the baking mould and swirl to coat the base completely
Sprinkle brown sugar all over the base
Drizzle honey over it.Sprinkle the almond flakes to cover the entire base.
I blanched the almonds in hot water, skinned, sliced and toasted it for a better look and flavour.
This is completely optional.


Add the coffee granules to boiling water and mix.
In a big bowl, mix the Oil, sugar and eggs vigorously.
Sift in first four ingredients from the cake list together and combine.
Add the coffee liquid and mix gently.
Pour this batter over the caramel base prepared earlier.

Bake in a preheated oven at 180 centigrade for 45 minutes or till a skewer comes out clean.
Remove from the oven and take out the cake upside down from the cake mould while the cake is warm.
Enjoy!


No bake,no gelatin, no effort strawberry cheesecake


One of my neighbours, is a very nice sporty gentleman in his sixties who long ago, agreed to be a guinea pig for all the experiments that took place in my kitchen. The only condition was that everything that went his way had to be egg less. I have faithfully complied and he has been a very appreciative and supportive audience of most of my culinary adventures.

Two days back, he dropped by for dinner. I took it as an opportunity to make something I have never tried my hands at and make use of the luscious strawberries I had picked up a day earlier from the grocer. I must admit that this experiment tasted yum but did not go the conventional route of a strawberry cheesecake. The cream tasted heavy for a light dessert and people had to dig real deep to spoon out the biscuit base, because of my not so perfect layering. I definitely intend it to have a go on this again next week with some improvisations. For now, sharing the recipe for two reasons-it was not a failure and it tasted fab with very little effort.

Ingredients-

For the base
Strawberry flavoured biscuits-20
Butter melted- 4 tsp

For the cream
Paneer-1 cup
Cream or malai-1/2 cup
Very thick curd-1/2 cup
Sugar powdered-6 tsp
Strawberry essence- 1 tsp
 Strawberries-3

Garnish-strawberry slices

Instead of making this dessert in a dish, I chose to do individual shot glasses.
Do not open the biscuit pack and crush the biscuits to powder by rolling the  rolling pin with pressure.Empty the  biscuit powder in a bowl and mix with melted butter.
Spoon out this mix into shot glasses and press to even out the base.
Put the glasses in the fridge for half an hour to set.


Crumble the paneer. Put paneer,curd,cream, sugar, essence and  strawberries in the mixer and run it for a few seconds till all becomes a uniform mixture. Do not run the mixer for long otherwise the cream will split and release whey. I had pink food colour so I added few drops to this mix. It is totally optional.

Take out the shot glasses with the set bases. Pour the cream mix over the  biscuit bases and garnish with strawberry slices. Keep this in the fridge for four to six hours before serving to set. Enjoy!

Thursday 6 December 2012

Homemade flavoured yogurt


Last month being a festival and wedding season, our taste buds were in for a party while our tummies went in for a gastric tumult. The rich and spicy gravies from the dinner buffets had to be balanced with something stomach soothing and nutritious during breakfast so we could stretch the patience limit of our tummies. Nothing better than a homemade flavoured yogurt which is healthy and calming for the stomach. It is such a loved dish in the family that people who do not like fruits also lick their bowls clean in moments. Apart from the health factor I also love this recipe for its versatility. One can make it in innumerable flavours and it tastes just the same or perhaps better than what is sold in the market.And of course the homemade yogurt has no preservatives..one may not require it as it would not last long ..I promise.

My personal favourite is Vanilla yogurt with a medley of fruits thrown in.It is also a wonderful substitute for heavy fruit cream. But I also make Pineapple and strawberry flavoured ones often too. I also experimented with coffee and chocolate flavours which I must confess did not turn out great. My father is fond of rose flavour and it was a hit with him too. In fact I often serve the saffron and cardamom flavoured yogurt with nuts as a final dessert in a lot of dinner parties at home and people love it. Enough raving about it..here goes the recipe.

Milk-1/2 litre
Milk powder-1/4 cup
Sugar-1/4 cup
Vanilla Essence or flavour of your choice-1 tsp
curd for culture-1 rounded spoon

Boil the milk with sugar. Add the milk powder and keep stirring so that no lumps are formed.
It is the milk powder which gives a creamy texture to the yogurt and also increases the protein content.
Once cooled , stir in the vanilla essence or whatever essence  you are using.
Add the curd culture when the milk is warm around 45 centigrade.(I just dip my finger and check).
Put the lid on and leave it in a dark warm place overnight.
You will have a creamy stiff yogurt in the morning .  Cool it in the fridge and add fruits and nuts of your choice before serving.
Few points to note here
1.Temperature is crucial here, so be careful when you add the curd culture.
2.If making Pineapple curd,do not use fresh pineapple. Stick to canned ones.
3.Do not add fruits while making the curd the previous night,as the curd culture will not happen uniformly.
4.If adding saffron, soak the strands with little warm milk separately and add to the boiled milk.
5. Exercise caution while adding citrus fruits and kiwi fruits as it splits the yogurt if kept for long.

Celebrating winters with carrot and orange cake


Its been exactly a month that I posted a new blog. It was not I did not bake the entire month but much to the contrary I baked a lot..seriously a lot but it has been a hectic month and I could not find time to sit and type about it. First it was Diwali and I baked a lot of goodies for giveaways and that had to be done in a short period of time,so I did not click any pics and write about it.This was followed by a wedding in the family and a lot of other social events for which again I did bake but sadly did not find the time to elaborate about it on net. Anyways I am back to baking and blogging now so why elaborate on reasons for not doing so in the past.

The winters are here. Shopping for veggies is more fun when one finds a lot of stuff that had been sorely missed during rest of the year. Oranges, Tangerines, mustard leaves, red carrot, fresh peas, and an incomprehensible variety of greens. Trips to the market have become more therapeutic than ever. We do get carrots round the year in Bangalore but they are those hard, light orange coloured ones. The red carrots make an appearance in the market only for a fortnight or so ,that too at a steep price but its worth it. The juicy firm texture full of flavour is definitely worth it. I grew up eating red carrots and all the year with orange carrots now is a compromise weighing heavily on the anticipation of that once a year ,fortnight of red carrots.
 So quickly before this sacred fortnight passes away,I need to make it more memorable to be able to cherish it and live without it for rest of the year. I decide to capture the love of the season in a heavy moist carrot and orange cake.This became such a hit that I do not have a picture of the final product which means that the cake vanished in moments after its exit from the oven. Nevertheless, will make it again and add the picture later.

Ingredients:
 Grated carrot-2 cups
Eggs-2
Oil-200 ml
Flour-1 and2/3 cup
Sugar-1 cup
Baking powder-1 tsp
Baking soda- 1 tsp
Salt-1/4 tsp
Fresh orange juice-1/2 cup
Zest of an orange- 1 tsp
For the zest of the orange, do not use the local  green and orange  skin variety.Stick to Sunkist orange for best results.
Raisins-handful
Cinnamon powder-1/4 tsp-I find Cinnamon too overpowering in flavour and hence use it sparingly but you can make changes according to your taste here.


1.Mix Oil, Sugar and eggs vigorously.Add the orange juice and zest.
2. Sift in the flour,Baking powder,soda and salt together. I used one cup of all purpose flour and 2/3 cup of wholewheat flour. Feel free to make changes according to your taste here. Mix gently.
3.Combine the grated carrot and a sprinkling on cinnamon.
4. I just added golden raisins to this cake but if you like more nuts, go ahead and add.
5.Pour the batter in greased baking pan and bake at 180 centigrade in a preheated oven for forty minutes or till the skewer comes out clean.
I got three cakes of six inches diameter from the above mentioned quantity.
This cake is heavy and moist in texture and a lovely yellow orange in colour. It is bursting with flavours and sure to be a hit with anyone who loves oranges and carrots.

Tuesday 6 November 2012

Instant Chocolate cake


As I write this new post about the Instant Chocolate Cake..lot of good labels light up in my head-best out of waste, the jiffy cake, serendipity, the rescue cake..Gosh what not.
The fact is that it is an all that cake.Here below I explain.

This weekend, I had unannounced guests on my door screaming for cake.Normally am elated at such demands assuming this as a sign of people's faith in my fast developing baking skills but it was different this time. I knew I was short on sugar and had run out of baking powder. It was almost impossible to live up to the expectation. To make it worse, I discovered that the hide n seek biscuits which I was about to serve with tea, had become limp..thanks to the incessant rains which I have been raving about in my previous blogs...
And then somewhere deep in my mind a bulb of hope lit up.
Many years ago,when I must have been in my early teens, I recalled an auntie from the neighbourhood mentioning about making a cake with Eno, the digestive fruit salt and making use of limp biscuits.
But this moment,it was just this idea..I was clueless about quantity ,baking time and temperature and other details. I decided to get my hands dirty and leave the rest to God.
Sure enough,when you believe in miracles ,they do happen.
I landed up with a most beautiful yummy cake which vanished moments after serving(I could barely snatch a moment to click the snaps).

What I love about this cake is
1.Minimal ingredients-just three items
2. Minimal effort
2.Very versatile..you can make it in  innumerable flavours. (Whatever flavours of biscuits or cookies you have in hand)
3. Again you can add ingredients of your choice,any nuts ,berries available with you and serve it any way you like it..with frosting, ice cream, cream, plain. I was experimenting ,hence did not try too many additives and made it plain. I served it with chocolate sauce and it was pretty good that way.
4. Above all..it is eggless:)

The quantities  I give here are  in rough measures and not absolute in nature.You may like to change the quantities as per your taste.

Ingredients-

Biscuits-grind them fine and the resulting powder should roughly measure up to two and a half cup
Milk-1/4 cup
Eno salt-3/4 tsp (Plz use the plain eno and not flavoured one)

Preheat the oven to 180 centigrade and grease a cake mould. The cake will double in height on baking, so ensure that you use a cake mould which leaves more than half of space empty after putting the batter.
Add milk to the ground biscuits and mix well.The batter should be of dropping consistency.
Now add the eno salt and mix lightly.
Please note that you have to bake the cake immediately now and not leave it for later. Otherwise the salt will lose its effect.
Bake for 35 to 40 minutes or till the skewer comes out clean.


Wednesday 31 October 2012

Almond cookie galore


Its cyclone Nilam today. Incessant rain, cold wind , dark clouds...consequently a chilly weather.One of those days when am thankful for not having a full time job so I can spend the day in the way that it ought to be spent. Curled up in the comforter with my favourite book, stare the garden outside and soak in nature, sip on a cup of steaming filter coffee and munch on cookies..Without any guilt , without any worry, without any work left incomplete..This is life...and this is how a rainy day ought to be celebrated..How many times in your life do you get to listen to your heart and do things the way the heart desires..not often I believe.That's why I feel thankful today to the Lord...To be able to do things the way the heart desires..surrender myself to the soul and let life take its own course...God thank you for this wonderful time, for this happiness in heart, for this beauty around.
The music of raindrops prancing on my rooftop stirs my soul and I am left mesmerised by the sights of  newly bathed greens outside..for once its difficult to focus on my favourite book too.I decide to warm my hands from the oven and spread some joy from my heart to the world. Its cookie time again.

I have to remind myself not to overindulge in this  happy state and stick to healthy stuff. (Yes worries of gestational diabetes still haunt me no matter how happy I am, especially with another blood test coming up next week). So I decide on some healthy ingredients that should satiate and delight and yet, not cause any stress.

Ingredients

Oats-1/2 cup (I used regular Quaker)
wholewheat flour- 1/2 cup
All purpose flour-1/2 cup
Sugar Powdered-3/4 cup
Almonds-3/4 cup
Baking powder-1 tsp
Salt-one generous pinch
Butter softened-1/4 cup
Oil-1/4 cup
Milk-1/4 cup

Powder the oats in the grinder and mix with wholewheat flour and AP flour.Also add the salt and baking powder to this mix and keep aside.
Whisk the sugar,butter and oil until creamy.
Toast the almonds lightly (for a wonderful aroma) and grind them.You can powder the almonds fine or if you like it chunky,keep the almonds to small bits or a coarse powder.
Sieve the flour mix into the butter and sugar mix.
Add the almond meal to this and mix gently.
Now use milk to bind this altogether to get a soft dough.


Now this where the fun begins. I have made three varieties of almond cookies from this dough and all of them have turned out a winner.

1.Standard almond cookie-Take small  balls from the prepared dough, flatten it on the greased cookie tray and bake for 15-20 min in a preheated oven at 180 centigrade. You can also decorate them with slivers of almonds if you want. These remained mostly white in colour with little specks of red brown which should be the clue that they are done and ready to be removed from the oven. Cool them on the wire rack for ten minutes to make them crunchy.


2.Choco chip Almond cookies- Press some chocolate chips on the cookies before baking-rest same as above.

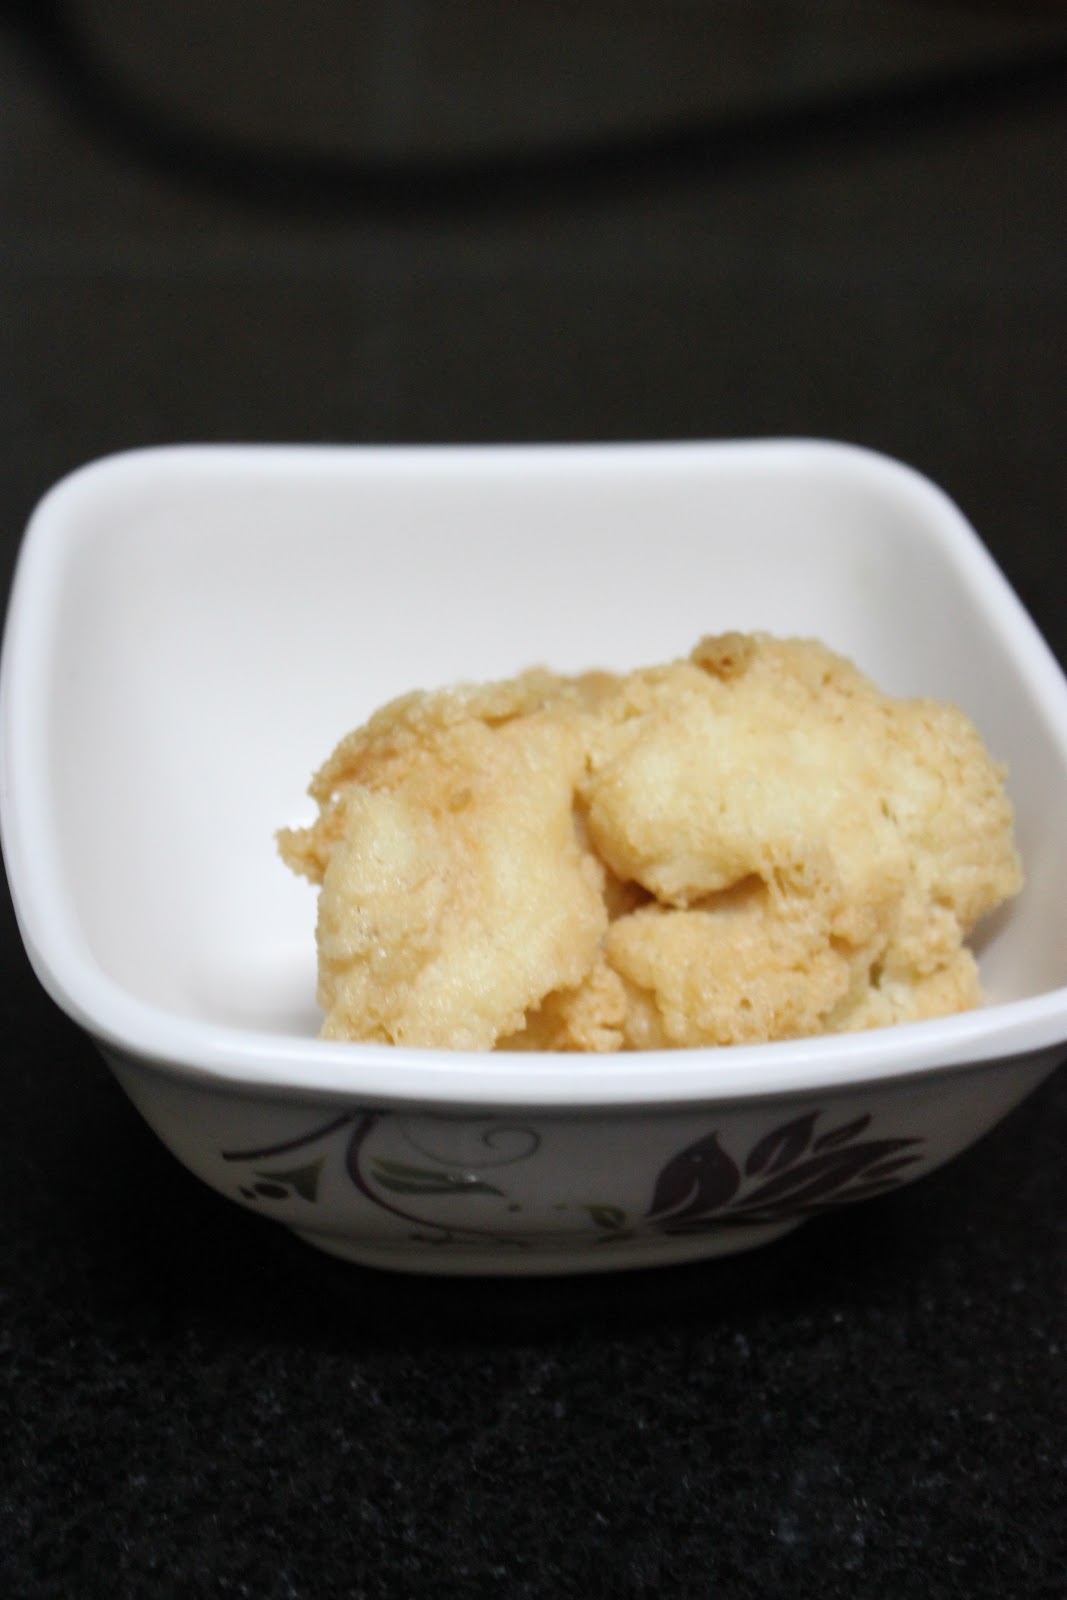
3.Nutella stuffed melt in mouth almond cookies- .
Admittedly am new to Nutella. I picked it from the grocer for the first time last week and after I saw the appreciation for these heavenly gooey centred cookies, I feel I have missed a lot in life not using Nutella before.This turned out to be best and am surely going to try more with Nutella.Although it did take a little effort making these cookies but in the end it was worth it.

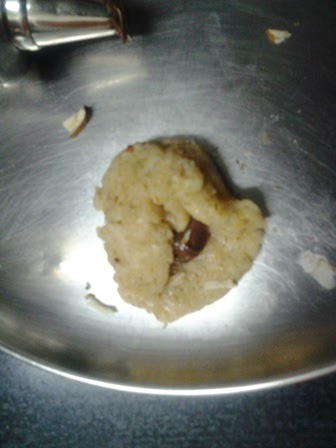
Make a walnut sized ball with the dough and flatten it. Scooping Nutella from the spoon was messy and difficult , so I piped some Nutella in my icing gun and from there it was a cakewalk.
For those who do not have a icing gun, make a plastic sheet cone like the ones they use for making henna decorations on the hand and fill it up with Nutella.
Put approximately 1/4 spoon Nutella in the flattened ball and enclose it. Reshape the ball and flatten it. Ensure that the filling does not ooze out.Bake for 15-20 minutes in a preheated oven at 180 centigrade.


Taste this piece of heaven and listen to your heart..Have a Happy day:)


Monday 22 October 2012

Peanut cookies galore


The days are becoming shorter. The early setting sun comes as a harbinger of  'on the way' winters. It brings back a lot of memories from my childhood when winters really happened in the city I grew up in. Foggy mornings, basking on the charpoy in the sun,  peeling luscious oranges, the smell of naphthalene balls from pullovers in the trunk , smears of Charmis winter cream(brand is long dead now I believe),  the subtle fragrance of sweet pea flowers in the garden ,chikkis , ginger tea and peanuts. A childhood sans the cable TV made every movie on the idiot box a precious watch.
Huddled up with the family in  heavy quilts, cracking open the peanuts with eyes fixed on the telly..mum reminding to clean up the peanut skins..Those were the best days indeed.

I now realise the source of this flooding nostalgia...its the smell of roasting peanuts in the microwave which is pushing me down the memory lane and I don't feel like coming back..Gosh such a pull!
I don't have much to do today and I could happily wile away hours reminiscing about my good old days.I try not to give in to this pressure of idleness and figure out a middle path. I decide to bake peanut cookies. An unexpected treat for the family, munching on which I can go back to savouring my good old days...


To begin with I was actually roasting peanuts for a chutney to accompany my dosas for lunch ( recipe of which shall come some day soon on this blog ) but now I have saved a cupful of roasted skinned peanuts for my cookies. I am  beginning to feel kind of excited about the cookies and wish to deviate from the path most taken, the standard recipe. Another factor is I don't want to use egg..the smell still freaks me out and its Navratras too.  Okay so its going to be a variety of peanut cookies..Finally I decide to bake
1. Standard peanut butter cookies
2.Chocolate Peanut cookies
3. Coffee Peanut cookies

This recipe yields roughly forty mid sized cookies.

Ingredients

Roasted skinned peanuts -1 cup
Wholewheat flour-1/2 cup
Maida flour- 1/2 cup
Butter softened- 1/2 cup
Sugar powdered- 1/2 cup
Baking soda- 1/2 tsp
Milk-2 tsp

Optional
coco powder for 2) Chocolate peanut cookies
 2 tsp Coffee granules plus 2 tsp milk for 3) Coffee peanut cookies

 Preheat the oven at 200 centigrade. Grease the cookie baking tray and keep aside.
Grind the peanuts to a coarse powder.
Mix Sugar and softened butter vigorously.
In a separate bowl, mix the wholewheat flour, maida flour and baking soda.
Now combine this dry mix with the butter and sugar mixture and mix vigorously.
Whisk in the peanut powder.
Add milk if the mixture feels too dry and knead to obtain a soft dough.
Now divide the mixture in three  equal parts.


From one part,make small balls ,flatten and place it on the greased tray. Bake these peanut cookies at 200 centigrade for 15 minutes.Importantly cool before consuming.The cookies come out soft straight from the oven and get their crumbling hard texture on being cooled.


For the choco peanut cookies, add 3 heaped spoons of cocoa powder to the second part.Mix and knead again.Make small balls ,flatten and bake at 200 centigrade for fifteen minutes


For the coffee peanut cookies, heat two spoons of milk and add two spoons of strong coffee granules.
Cool this coffee liquid and mix it to the dough.Knead again. If the dough feels too wet to handle, use a sprinkling of flour and make small balls. Flatten and bake for fifteen minutes at 200 centigrade.

Enjoy the warm cookies with ginger tea and you can  almost taste the childhood days in the heart:)


Sunday 14 October 2012

Tea time coffee muffins


  The weather continues to be unpredictable.After a warm sultry night ,woke up to a lovely drizzle. As I opened my bedroom window ,the cool, wet grass scent laden breeze hit me. I gulped in the delicious air ,filled my nostrils with fragrance of wet autumn leaves and feasted my eyes on the freshly bathed trees and grass... Gosh!I can spend my entire life staring this and never get tired .
The weather continued to be like this the entire day.An overcast sky,a cool breeze with intermittent showers..The popular poem about having no time to stand and stare has never really been for me. I  spent most of my day in the balcony,staring the bathing birds,chirping with delight,the remaining raindrops on the leaves, the whole world looking neat and clean without a speck of dirt... This deep reverie of nature 's beauty sent my spirits soaring and I got in the mood to celebrate.
There is no pleasure like sipping on  a steaming cup of filter coffee and biting into coffee flavoured muffins with sweet chewy pieces of figs melting in the mouth...Along with the music of pitter patter of the raindrops outside...its a treat for the soul!

Coffee muffins

Ingredients

Flour- 1 1/4 cup
Sugar-3/4 cup
Oil- 3 tsp
Milk- 3/4 cup
Baking Powder- 2 tsp
Salt-1 pinch
Egg-1
Strong coffee granules- 2 heaped spoons
Figs chopped-1/4 cup
Optionally- any chopped nuts


Preheat the oven at 180 centigrade.
Heat the milk,dissolve the coffee granules and cool for five minutes.
Whisk the egg, oil and sugar together till creamy.
Add the coffee milk, mix.
Sift in the flour, baking powder and salt together.


Mix lightly and add in the chopped figs or nuts.
Pour the batter in the greased muffin moulds and bake at 180 centigrade for twenty minutes or till the skewer comes out clean.


Sunday 7 October 2012

Wholewheat Apple raisin bread

Its been a sad and a dull week. V succumbed to the changing weather and was on bed with throat infection and fever.It was miserable to watch him suffer:( . Though he was up by Friday but he had a lot of trouble swallowing because of a persistent throat ache.The entire week we had soups and bland daals and khichdi. So Friday I decided to bring in some cheer and bake a healthy apple bread.It was demolished in moments and only the crumbs remained which said a lot about the taste and the soon vanishing throat ache:)

Ingredients-


Whole wheat flour( atta)-1 cup
Baking soda-1/2 tsp
Baking powder- 1/2 tsp
Salt- 1/2 tsp
Apple-one (peeled and diced small)
Cinnamon powder- 1 large tsp
Brown Sugar-1/2 cup
Egg-one
Oil- 1/4 cup
Raisins-1/4 cup
Curd-4 tsp
Chopped nuts-optional

Its a simple bread procedure wise.Sieve the first four ingredients together and keep aside.
Sprinkle half a spoon of cinnamon on the diced apple and keep aside.
Now whisk sugar,oil, curd and egg together.Add the flour mix gradually followed by diced apples,leftover cinnamon powder, raisins and nuts if using.Add more curd if the mixture feels too dry. I used 4 X 8 inches loaf pan for this bread.Bake in a preheated oven at 180 centigrade for forty minutes or till a skewer comes out clean.


Monday 1 October 2012

Masala Oats bread


Last week was a week of indulgence..with cakes and cookies. In my heart I am scared if I pushed my sugar limits too high,so here I begin a week of austerity with a fat less,egg less, oatmeal bread..surprisingly it is yum in spite of how lacklustre it sounds and I can survive on this without complaining.


Although its a quick bread,does not requiring the tiring labour with yeast, it still needs to be done a little bit in advance. Also a word of warning,this bread does not bake tall. It is a heavy bread in texture and not a light springy bread that we pick up from the market. It best goes with a bit of butter or cheese spread,but thanks to my austerity drive, I had it with a cup of coffee for breakfast and it tasted wonderful.
Apart from the health factor, I love this bread for its versatility.One can make so many variations of this.I chose cumin and kasoori methi flvaour but one can go for curryleaf, dillweed, coriander..sky is the limit.

Ingredients

Oatmeal-225gm
Buttermilk-360ml
Baking powder-2 tsp
Plain flour-100 gm
Salt-1/2 tsp

Buttermilk tempering-Below is what I chose for my bread but you can change and choose from other spices depending on your taste.Also you can totally omit the tempering and make a plain bread if you desire.

Oil-1tsp
fenugreek seeds-1/4tsp
Cumin-1tsp
Chilli powder-1/2 tsp
Kasoori methi-2 tsp

Heat oil in a small skillet and add cumin and fenugreek seeds.Switch off the gas as they splutter.Add red chilli powder.Pour this tempering on the buttermilk and add kasoori methi. Mix.
Soak the oatmeal in this buttermilk overnight.

Next, put together salt, baking powder and flour and gradually start adding it to the soaked oatmeal.
 

Once done mixing,you will get a sticky dough. Place it in a greased tin and bake it for 40 min in a preheated oven at 180 centigrade.Optionally you can also brush the dough with melted butter before baking for a smooth brown top.I did not do that:) Instead I added flaxseed to my batter to boost up the health quotient.


Friday 28 September 2012

Zebra cake for fun

Off late,weather in Bangalore has been extraordinarily warm and the contrasting cold temperatures in the night have taken a toll on everyone's immunity.A lot of people around have been experiencing bouts of fever and respiratory problems.I learnt over phone today that a neighbour's three year old son had just come back the previous day after spending a night in the hospital because of breathing issues.His mother told me that though he was well now,he was cranky and refusing to eat anything.
I decided to bake a fun Zebra cake to cheer him up.I clearly knew the magic of the Zebra cake worked as I saw him sipping his orange juice along with a slice of cake on his own without any coaxing or cajoling!:)

This one is for little Augastaya...Hope to see you cycling on your blue tricycle in the evening..

Zebra cake ,although is a simple chocolate and vanilla combo cake,its a very visually appealing cake,specially for little children.Also its a lot of fun making it...

Ingredients-

Sugar-2/3cup
Flour-11/4cup
Egg-1
Salt-1/4 tsp
Baking soda-1/4tsp
Baking powder-1tsp
Oil-1/2 cup
Curd-4tsp
Vanilla essence-1 tsp
Cocoa Powder-3 tsp

Sieve together Flour+Salt+Baking soda+Baking powder and keep aside.
Whisk egg+ sugar+Oil+curd + vanilla essence together.
Gradually add the dry mix to liquid mix and whisk.
Now Divide the combined mixture in two vessels.
To one vessel add the cocoa powder and mix.


Take an eight inch baking mould and grease it.(I have used two 4 inch moulds here)
The trick is to bring layer effect by alternately spooning the two mixtures.
Put one spoon of the vanilla mix in the middle of the mould and let it spread out on its own.
The consistency of the mixture should be such that it should spread on its own without shaking or stirring the pan.Then spoon the cocoa mix over it in the middle followed by vanilla again.Continue spooning the two mixtures alternately till the end.


Bake in a preheated oven at 180 centigrade for forty minutes or till done.
Check by inserting a fork in the middle,if it comes out clean,the cake is done.


Wednesday 26 September 2012

Simplest Banana bread ever

Today, we woke up to a dark and gloomy morning and found on the news channel that the morning sun had been driven away by the Thane cyclone …More rain, super speed winds and a chilly temperature have been prophesised to keep us indoors well till the new year arrives.
What a bummer…I am thinking as I see my plans for a long drive to the sunlit countryside crumble in the rain. Husband is refusing to come out of the cosy comforter and my heart is sinking for a trip that never took off and a dark dreary day that will have to be spent indoors staring the rain from the window sill.
Leaving my husband to be better lazy goose than I am, I pop into action and head straight to the kitchen from the bed. On a day like this nothing lifts the spirits better than a warm banana bread and a steaming cup of coffee served straight on the bed.
From the corner of my eye I can see two old bananas in the fruit basket, blackened, crying to be consumed or waiting to be trashed. As it happens these overripe bananas which appear to be beyond the state of consumption are going to be the star ingredients of my breakfast.
Here goes my tribute to CycloneThane(with prayers that it does not cause loss of life or any damage)
This is a no fuss recipe and I love it for its simplicity and the fact that bananas which have lost the visual appeal are put to best use allowing their wonderful fruity flavour to shine out.
Ingredients
1/2cup sugar-unlike other cake recipes you don’t have to powder it…less work!
½ cup mashed bananas-I prefer to use the bananas which appear to be goners and beyond use. However please don’t use the ones where fungus is visible on the fruit after peeling also. Two small bananas or one big one should suffice. Just peel the banana and mash it with the back of a fork. I like to leave chunks and not make it creamy .You can do it whichever way you prefer.
1 egg
½ cup oil-feel free to use healthy oils like canola or olive oil instead of the regular vegetable one
2/3 cup flour-again feel free to use whole wheat flour (regular atta)instead of the usual refined flour
1/3 cup curd-lends a nice moistness to the cake
1tsp vanilla essence
1tsp baking powder
¼ tsp baking soda
1/4tsp salt
1/4cup Chopped nuts, raisins
Here we go
1. Take a big bowl and whisk sugar into the mashed banana
2. Add the egg and whisk
3. Add curd and vanilla essence and whisk again
4. Sieve in the dry ingredients (flour+baking powder+soda+salt) together into the banana mix.
5. Fold in the dry mix with gentle upward moves and Do not vigorously mix with round movements. Do not worry about the small lumps as they give a fluffy texture to the cake on baking.
Note: If the mixture appears too fluidic, add one or two spoonfuls of flours as appropriate.
6. Add the nuts
7. Pour the mixture in a greased 4X8 baking dish
8. Bake in the preheated oven at 180 degrees for 40-45 minutes or until done. Cake is considered done when a fork inserted in the centre comes out clean.
The rain has paused already as I am admiring the gently rising light brown cake in the oven and brewing the coffee. The heavenly warm smells whiffing from the oven to the bedroom have already made my husband sit up in anticipation..

*Here in the pic I have added some grated dark choclate on top of the batter just before baking..It lends a wonderful choclaty twist to the banana cake!

No fuss cocconut cookies

With my gestational diabetes scare gone with a negative test result,I decided to treat myself today with something special and sweet:).The nightmares of insulin shots had been haunting me for days and I am so glad that its over.I still have to be careful with my carb and sugar intake but what the heck..I am in a mood to celebrate today.I had been yearning for something coconut and sweet..so coconut cookies it is!

I have never been fond of egg and my pregnancy has raised the degree of detesting to plain abhorrence.The egg smell just freaks me out nowadays so it is an eggless recipe for sure.
Here we go..
Ingredients-

 Coconut grated-1 cup
All purpose flour-200 gm
Sugar-125gm
Butter-100gm
Baking powder-1tsp
Milk-2tsp
Optional-vanilla essence OR green cardmom powder(elaichi)-1tsp
              Handful of raisins for topping

Soften the butter in microwave for 20 seconds and whisk in the sugar.
If you are using very big sugar granules,it will make sense to powder the sugar before using it.
If using vanilla essence or cardmom powder,add it now.
Sieve in the flour and baking powder together and mix.
Add in the coconut powder and knead the dough.
Use milk if the mixture is too dry to handle.
Make small balls,top it with a raisin and flatten it .
Place it on a greased baking tray and bake in a preheated oven for 15 minutes at 180 centigrade.

These cookies will expand on baking so make sure there is ample space between the cookies when placing.The cookies are done if the bottom edge appears brown.Cool them for 15 minutes after baking for the trapped heat to cook the tops and make it crunchy.

This yields roughly 36-40 mid sized cookies
 

Friday 11 May 2012

Almond Brownie with a coconut twist

Its a lovely weather nowadays in Bangalore.Dry and sunny during the day when you can dry your laundry in minutes,dark and breezy towards the evening.Often followed by gentle showers that bring a new lease of life to all the living.It is such a combination of warm and cool that I cant help thinking of a similar delightful culinary combo-warm brownie with cool and creamy vanilla ice cream.An anytime mood lifter, and everyone's favourite in the family.
I decided to bake brownies today evening before husband returned from work.While I was preparing and baking,it was a blazing sun out side and just as I was taking out the ice cream from the freezer to serve,I could hear the roar of black clouds approaching my balcony...hot and cool..sun and rain. brownie and ice cream..such a tantalising play of temperatures!

Today,I decided to ditch the regular walnut brownie for an almond one with a coconut twist.
Below given is the almond brownie recipe

Ingredients

2 eggs
1/2cup butter
1/2 cup chopped almonds
1/2 cup flour
1/2 cup cocoa powder
2/3 cup brown sugar if you are using sweet cocoa powder and 1cup if you are using non sweet coco powder
1/2 tsp baking powder
1 tsp vanilla essence

*For the coconut twist
Instead of vanilla essence I used 2 tsp of coconut liquor(I used Malibu rum)
plus two large spoon of dessicated dry coconut

Preheat the oven to 180 degree.
Grease a small cake tin and keep aside
Melt the butter for 15 sec in the microwave and beat in the sugar.
Beat in the eggs one by one and add the rum or vanilla essence.
Sieve the cocoa powder,flour plus baking powder together into the mix.
I generally like to roast the nuts before adding for that special aroma but you can use them anyway you like.Add the roasted almonds and dessicated coconut  to the mix.

Pour the batter into the greased cake pan and bake for 35-40 min until done.
Serve with vanilla ice cream and roasted nuts on the side or just make it gooey with  hot chocolate sauce:)

Tuesday 8 May 2012

My cappuccino Museli

During my long working days at the office this ,used to be my staple breakfast.Apart from that fact that its so healthy and wholesome,this really can be made in a jiffy.I never got bored of eating this for almost everyday for three years because I always tweaked the recipe with different fruits or different nuts.This, till date is my favourite breakfast item.You can make a hundred different versions of it depending on your taste.Its healthy and a child 's play recipe.Below given is the conventional recipe followed by a modern and a much quicker version:-)


Serves-1
4tsp Oats-I use Quaker
1 cup milk-
1tsp sugar
1tsp strong coffee granules
6 Almonds
10 raisins
any other nuts or seeds of your choice

Heat milk,add sugar and coffee.Bring it to a boil .
Remove from fire and stir in the oats.Leave it for ten minutes for the oats to cook in the hot milk.
Sliver six almonds and roast them for a minute in a skillet over fire.(You can always add almonds without roasting it but once you get hooked to the aroma of roasted almonds,you will never want to add it just like that.)
Add it to the milk soaked oats.
Wash the raisins and sprinkle.on the oats.
Its ready to be served:-)
*I add flax seeds and melon seeds for a more healthier meal.
You can again vary the recipe by adding Cinnamon powder or vanilla essence or anything of your choice instead of coffee granules.

The quicker version involves flavoured packaged soy milk instead of regular milk.You only need to take two moments the previous night to create the base.Pick any of you favourite flavoured soy milk and soak the oats the previous night.Add some chopped fruit like banana or apple or both and its ready to be eaten.

Monday 7 May 2012

All time Oats

This is one of  those versatile items which I frequently serve for breakfast and also fix it for lunch when I am too lazy to cook for myself alone.I love this recipe for the fact thats its quick as a breeze and very healthy.And it would not be on my blog if it isn't yummy!:-)

serves-1

Ingredients

4 tsp Oats-I use Quaker
1 small onion
1 small tomato
half cucumber
1/2 inch ginger-chopped real fine
1/2 cup curd
2/3 cup water

Tempering
1tiny spoon of oil-I prefer mustard..you are free to use any
1 v small green chilly-you can use more if you like things hot
1/2 tsp of mustard seeds
salt to taste

optional items for tempering
curry leaves
fenugreek seeds
asoefetida
cumin

Take 2/3 cup of water in a microwaveable pot and microwave for one and a half minute.
The water would come out boiling,stir in the oats in the hot water.
If you are using gas stove,heat 2/3 cup of water and stir in the oats in the boiling water.
Leave the oats aside for 10 minutes.Once the oats have cooked and cooled down stir in 1/2 cup curd.

Chop onion,tomato and cucumber  real fine.Add the chopped veggies to the oats mix.
Sprinkle salt to taste.

In a small skillet,heat oil.
Add asoefetida, fenugreek seeds and mustard seeds.Once the seeds start spluttering,switch off the gas.Add chopped deseeded green chillies and curry leaves and pour the tempering over the oats mix.
Garnish with chopped coriander leaves and serve.